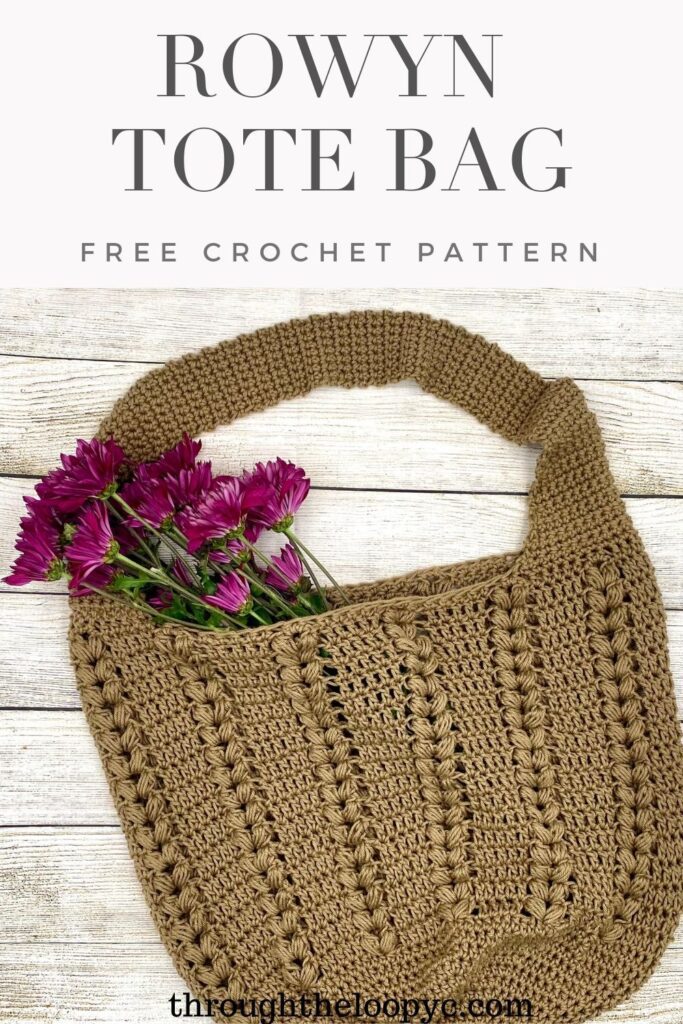
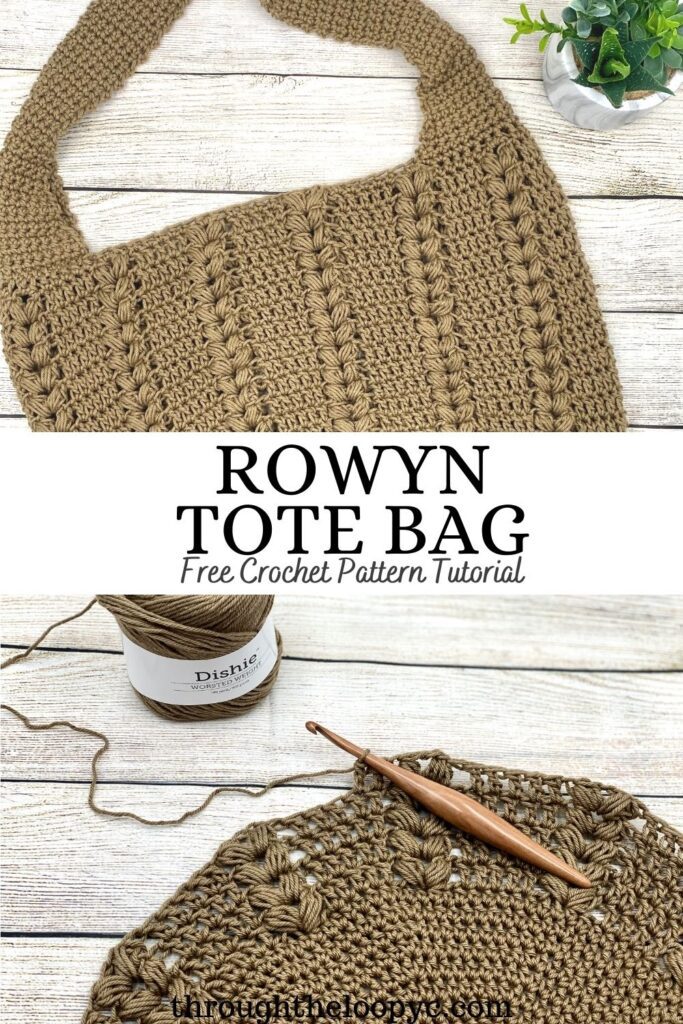
Crochet Tote Bag – Free Pattern
Are you a crochet bag fanatic?! I find there is something so fun and relaxing in working up crochet bags. I had a lot of fun designing the Rowyn Crochet Tote Bag. It works up quick, and the pattern repeats are almost meditative.
Save It To Your Favorites

Rowyn Tote Bag Ad-Free Premium PDF Printable
Get your copy of the premium ad-free PDF pattern. The Premium version includes photo stitch tutorial!


Easy Crochet Tote Bag
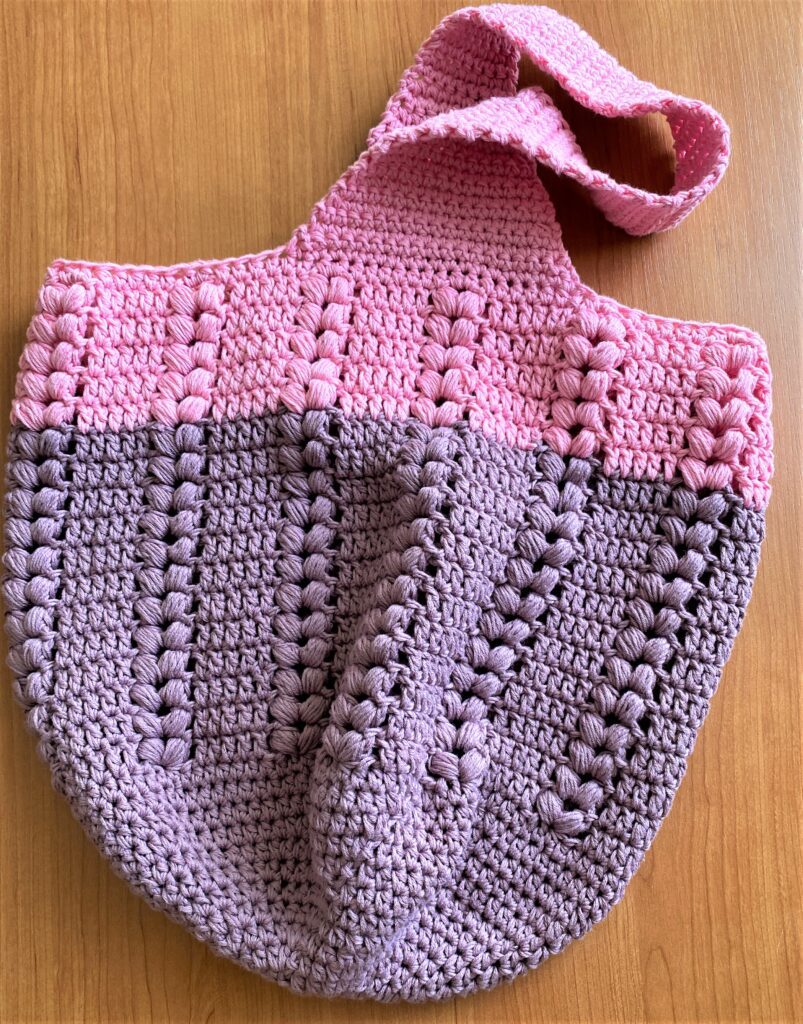
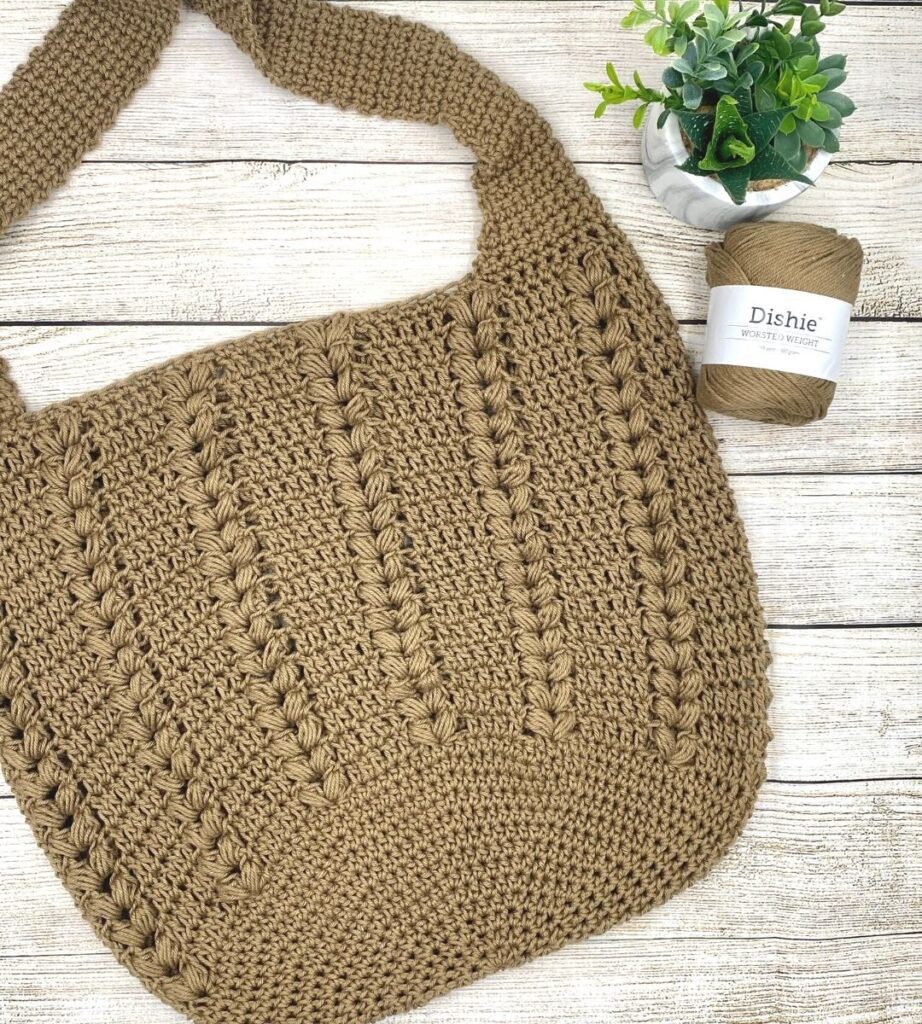
The Rowyn Crochet Tote Bags is full of texture and some boho vibes. It works up quite easily and looks more complicated than it really is. If you’ve got the crochet basics down, you can crochet this!
The pattern is worked in the round using increases for the base. the body of the bag is a 1 round repeat and doesn’t require much counting. The strap is easy to customize to make a shorter over the shoulder strap, or longer for the crossbody bag
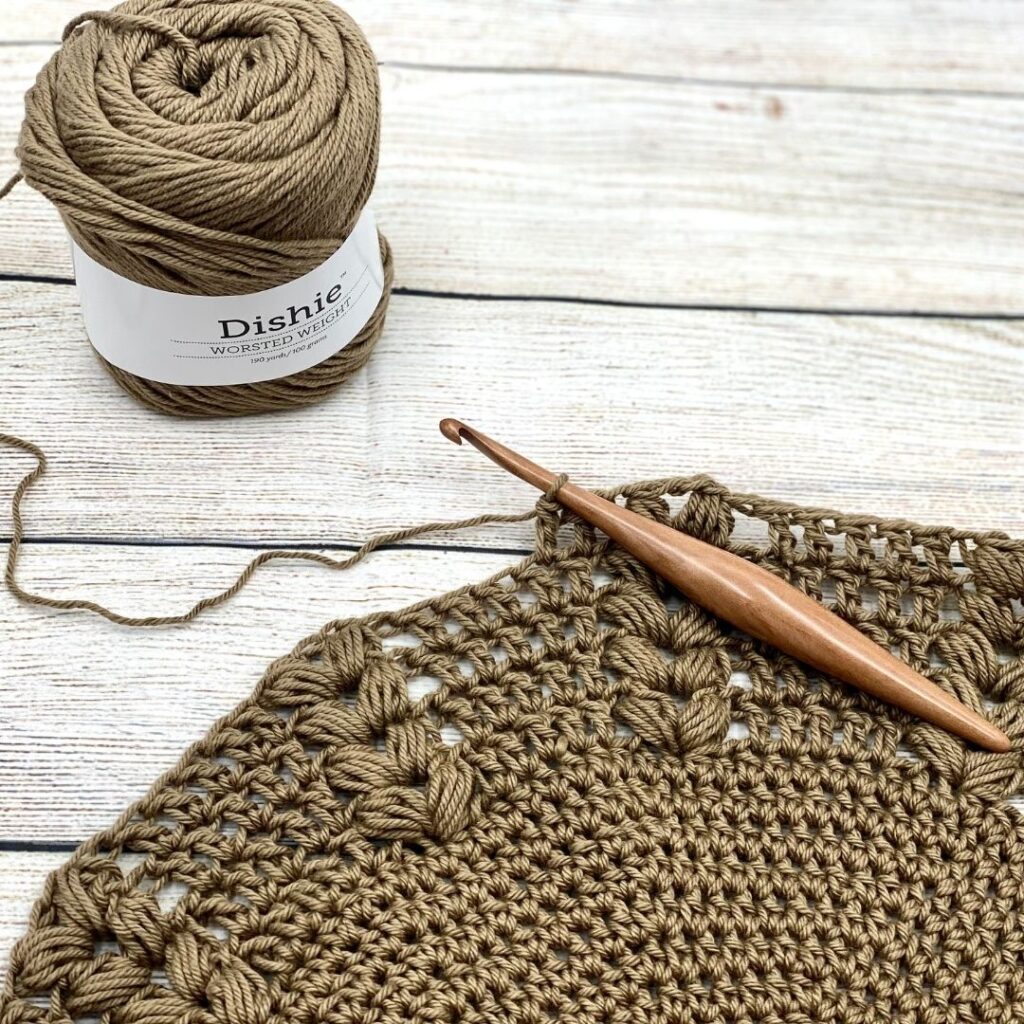
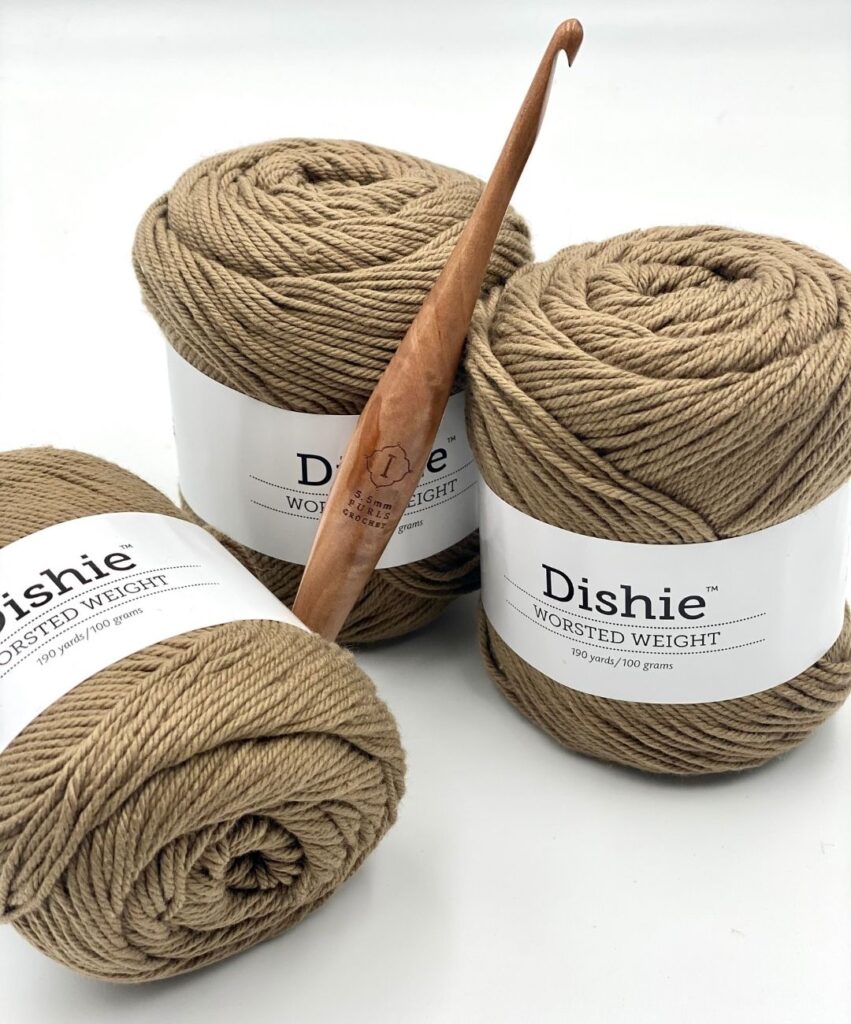
I chose to use *WeCrochet’s *Dishie Yarn in Mushroom. Dishie is a sturdy and soft cotton and I really love the earthy colour Mushroom.
A special thank you to *WeCrochet for providing the yarn for this project.
Video Tutorial

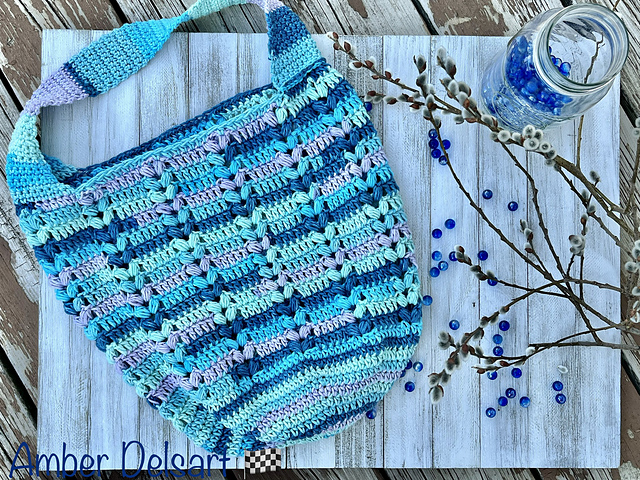
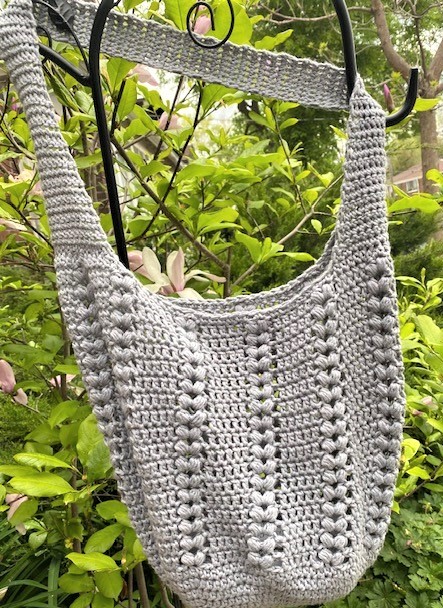
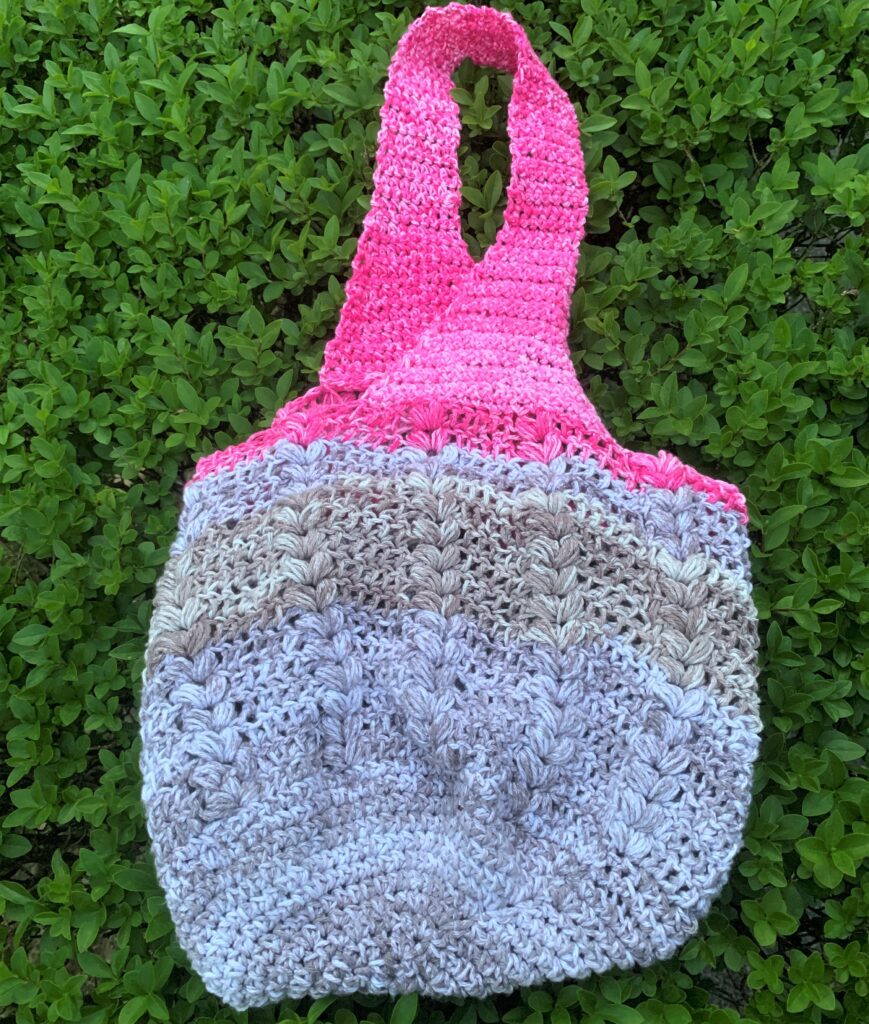
The Tester Pictures
My testers Tote Bags came out beautifully, they had some fun colour combinations too!
Some of the yarns they used included: Drops Safran, Big Twist Cotton, Peaches And Cream Stripey, and Loops & Threads Crème Cotton.
Crochet Tote Bag Details
Materials
- Approx. 550 – 570 yds of #4 worsted weight cotton yarn. I used *WeCrochet Dishie in Mushroom
- US size H/8 – 5.0mm crochet hook. I used my *Furls Streamline
- *Scissors
- *Yarn needle
- *Tape measure
Difficulty
Easy – Intermediate
Gauge
9 sts x 5 rows = 2″ Patten for gauge: hdc
Size
Laid flat: Approx. 15″ tall x 16.5″ wide, no stretch, not including strap
Stitch Abbreviations
- ch(s) – Chain(s)
- sc – Single Crochet
- hdc – Half Double Crochet
- dc – Double Crochet
- Pf – Puff Stitch
- sc2tog – Single Crochet 2 together
- MC – Magic Circle
- slst – Slip Stitch
- chsp – Chain Space
- st(s) – Stitch(es)
- sk – Skip
- rnd(s) – Round(s)
Pattern Notes
- US Terminology
- All beginning ch1 and ch2 do not count as a stitch
- Bag is worked bottom up in rounds
- To adjust height of the body of the bag add or subtract repeat rnds
- To adjust length of the strap add or subtract repeat rows
- Pattern is worked in multiples of 5
- *-* denotes repeat sequence
Special Stitches
Photo tutorial for the special stitch used is available in the downloadable PDF or the YouTube Tutorial.
Puff Stitch (Pf): Yo, insert hook into indicated st, yo pull up a loop (3 loops on hook), yo, insert hook into same st, pull up a loop (5 loops on hook), yo, insert hook into same st, pull up a loop (7 loops on hook), yo, insert hook into same st, pull up a loop (9 loops on hook), yo, pull through all 9 loops, ch1.
NOTE: for this pattern you want to yo and insert your hook 4 times for each Ps.
Crochet Tote Bag
The Pattern
BASE
MC
Rnd 1: 10 hdc into the circle, pull closed, slst to the top of the first st to join, ch1 (10).
Rnd 2: 2 hdc in each st around, slst to the top of the first st to join, ch1 (20).
Rnd 3: 2 hdc in the first st, hdc in the next, *2hdc in the next st, hdc in the next st*, repeat around, slst to the top of the first st to join, ch1 (30).
Rnd 4: 2 hdc in the first st, hdc in the next 2 sts, *2hdc in the next st, hdc in the next 2 sts*, repeat around, slst to the top of the first st to join, ch1 (40).
Rnd 5: 2 hdc in the first st, hdc in the next 3 sts, *2hdc in the next st, hdc in the next 3 sts*, repeat around, slst to the top of the first st to join, ch1 (50).
Rnd 6: 2 hdc in the first st, hdc in the next 4 sts, *2hdc in the next st, hdc in the next 4 sts*, repeat around, slst to the top of the first st to join, ch1 (60).
Rnd 7: 2 hdc in the first st, hdc in the next 5 sts, *2hdc in the next st, hdc in the next 5 sts*, repeat around, slst to the top of the first st to join, ch1 (70).
Rnd 8: 2 hdc in the first st, hdc in the next 6 sts, *2hdc in the next st, hdc in the next 6 sts*, repeat around, slst to the top of the first st to join, ch1 (80).
Rnd 9: 2 hdc in the first st, hdc in the next 7 sts, *2hdc in the next st, hdc in the next 7 sts*, repeat around, slst to the top of the first st to join, ch1 (90).
Rnd 10: 2 hdc in the first st, hdc in the next 8 sts, *2hdc in the next st, hdc in the next 8 sts*, repeat around, slst to the top of the first st to join, ch1 (100).
Rnd 11: 2 hdc in the first st, hdc in the next 9 sts, *2hdc in the next st, hdc in the next 9 sts*, repeat around, slst to the top of the first st to join, ch1 (110).
Rnd 12: 2 hdc in the first st, hdc in the next 10 sts, *2hdc in the next st, hdc in the next 10 sts*, repeat around, slst to the top of the first st to join, ch1 (120).
My base was approx. 11″ diameter
Body
Rnd 13: Hdc in the first st, hdc in each st around, slst to the top of the first st to join, ch2 (120).
Rnd 14: Dc in the first st, dc in the next 4 sts, sk 2 sts, (Pf, ch2, Pf) in the next st, sk 2 sts, *dc in the next 5 sts, (Pf, ch2, Pf), in the next st, sk 2 sts*, repeat around, slst to the top of the first st to join, ch2 (60 dc, 24 Pf).
Rnd 15 – 29: Dc in the first st, dc in the next 4 sts, (Pf, ch2, Pf) in the next chsp, *dc in the next 5 sts, (Pf, ch2, Pf), in the next chsp,* repeat around, slst to the top of the first st to join, ch2 (60 dc, 24 Pf).
Rnd 30: Dc in the first st, dc in the next 4 sts, (Pf, ch2, Pf) in the next chsp, *dc in the next 5 sts, (Pf, ch2, Pf), in the next chsp,* repeat around, slst to the top of the first st to join, ch1 (60 dc, 24 Pf).
Rnd 31: Hdc in the first st, hdc in the next 5 sts, 2 hdc in the ch2sp, *hdc in the next 6 sts, 2 hdc in the ch2sp*, repeat around, slst to the top of the first st to join, ch1 (107).
Strap
Starting from where you completed rnd 31, count over 53 sts, place stitch marker here. Starting in the next st, count over 20 sts, place another stitch marker here. This will be where you attach the other end of the strap.
Using the ch1 from where you completed rnd 31:
Row 1: Sc in the next 20 sts, ch1, turn (20).
Row 2: Sc2tog, sc in the next 16 sts, sc2tog, ch1, turn (18).
Row 3 – 4: Sc in each st across, ch1, turn (18).
Row 5: Sc2tog, sc in the next 14 sts, sc2tog, ch1, turn (16).
Row 6 – 7: Sc in each st across, ch1, turn (16).
Row 8: Sc2tog, sc in the next 12 sts, sc2tog, ch1, turn (14).
Row 9 – 10: Sc in each st across, ch1, turn (14).
Row 11: Sc2tog, sc in the next 10 sts, sc2tog, ch1, turn (12).
Row 12- 13: Sc in each st across, ch1, turn (12).
Row 14: Sc2tog, sc in the next 8 sts, sc2tog, ch1, turn (10).
Row 15 – 16: Sc in each st across, ch1, turn (10).
Row 17: Sc2tog, sc in the 6 next sts, sc2tog, ch1, turn (8).
Row 18 – 63: Sc in each st across, ch1, turn (8).
Row 64: 2sc in the first st, sc in the next 6 sts, 2 sc in the last st, ch1, turn (10).
Row 65 – 66: Sc in each st across, ch1, turn (10).
Row 67: 2sc in the first st, sc in the next 8 sts, 2 sc in the last st, ch1, turn (12).
Row 68 – 69: Sc in each st across, ch1, turn (12).
Row 70: 2sc in the first st, sc in the next 10 sts, 2 sc in the last st, ch1, turn (14).
Row 71 – 72: Sc in each st across, ch1, turn (14).
Row 73: 2sc in the first st, sc in the next 12 sts, 2 sc in the last st, ch1, turn (16).
Row 74 – 75: Sc in each st across, ch1, turn (16).
Row 76: 2sc in the first st, sc in the next 14 sts, 2 sc in the last st, ch1, turn (18).
Row 77 – 78: Sc in each st across, ch1, turn (18).
Row 79: 2sc in the first st, sc in the next 16 sts, 2 sc in the last st, ch1, turn (20).
Match row 79 with where you place the stitch markers on the body of the bag. Slst, or sew using your yarn needle, the end of the strap to the body of the bag in each of the 20 sts, tie off.
Weave in all ends and you’re done!
All Set!!!
There you have it! Your very own crochet tote bag!
Prefer printed copies better?! The ad-free printable premium PDF version with stitch tutorial is available on Etsy or Ravelry!
While you’re here why not take a look at my other patterns?!
If you’d like to stay In The Loop with all things Through The Loop Yarn Craft join the Newsletter for a special gift and updates of pattern releases and special offers!
I hope you love your Rowyn Tote Bag!! I would love to see how yours turn out!
Thanks for stopping by!

Please feel free to sell your handmade products created from this original Through The Loop Yarn Craft pattern. I ask that you please give credit to Ashley Edmonds from TTLYC as the designer, when possible, and link back to www.throughtheloopyc.com and/or @throughtheloopyarncraft (on social media) when selling and sharing images online.
©2022 Through The Loop Yarn Craft – Ashley Edmonds This pattern and its associated images are copyright protected. The pattern is for your personal use only. Please do not copy/paste, distribute, or alter and claim as your own.
*Indicates an affiliate link which means I may receive commissions if you choose to purchase through links I provide (at no extra cost to you). Thank you for supporting the work I put into this site!. Read my full disclosure here.


2 Comments
Chuck Baber
I downloaded the free pattern for the Rowyn Tote Bag, and also watched your tutorial. There is an unclear instruction line in the written pattern. Row 31 reads hdc in 6 stitches and 2 hdc in the chain space between the puff stitches. The tutorial shows 5 hdc in 5 dc stitches, 1 hdc in chsp before puff stitch, 2 hdc in chsp between puff stitches, and 1 hdc in chsp following the puff stitches. Since there are 60 dc and 24 puff stitches, there should be 4 hdc for each pair of puff stitches, and 1 hdc for each dc. The 4 hdc is 1 before, 2 between, and 1 after each pair of puff stitches. So total hdc stitch count should be 60 + (4 x 12), which is 108 stitches, not 106. In your tutorial, you lay the bag down after row 31, and I noticed that there are only 4 dc between 2 pairs of puff stitches instead of 5 for one of the several sections visible. This would change the hdc count to 107, and if there is one more section with only 4 dc instead of 5, that will give the stated 106 hdc stitch count.
I write this comment to be helpful, not critical, as I myself was confused regarding the written pattern and the hdc stitch count. I like the tote bag design, and thank you for providing a free pattern, and video tutorial!
Ashley
Hello,
Thank you so much for your feedback. I truly appreciate it.
I had another look and yes, I did make an error in the row 31 st count. It should be 107 since you don’t do the 4th hdc after the last PS.
I have updated.
Thanks again for bringing this error to my attention.
Ashley